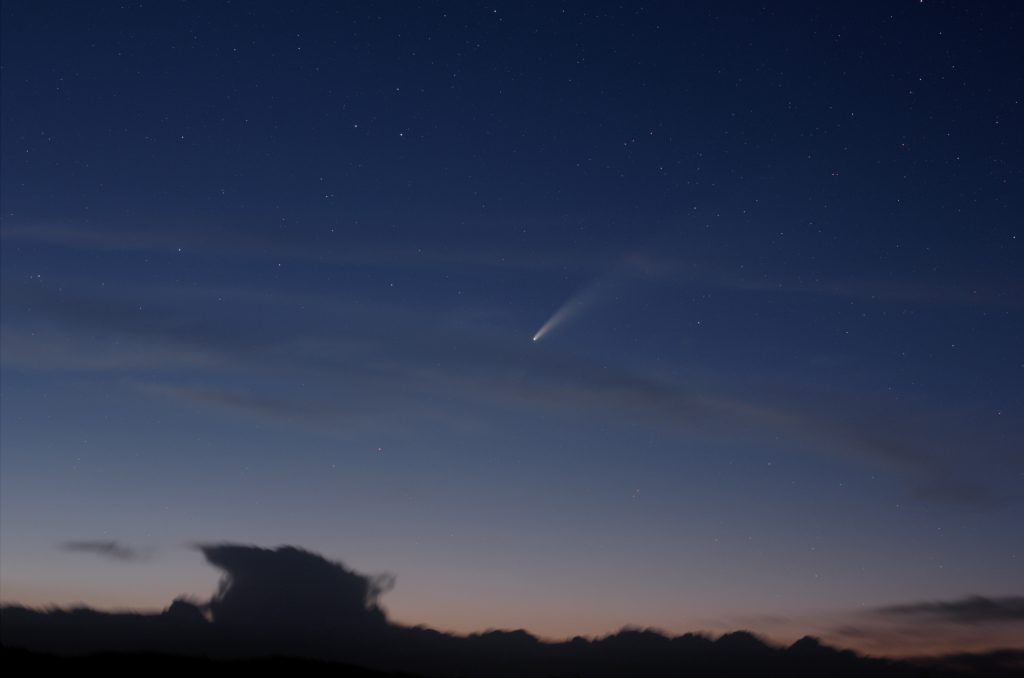
Comet NEOWISE (C/2020 F3) has blossomed into a fine sight right now in the early evening sky. Dottie and I watched it last night and it was obvious low on the northwest horizon. Here in our dark skies I estimated that the tail was about six degrees long to the unaided eye.
Since the comet is very low in the sky I set up a photo rig on the driveway where I could see down to the horizon. I can't actually image that low from the observatory. This picture was taken at 9:18, about an hour after sunset, so it wasn't totally dark yet. Even though some clouds are in the way, a good amount of its dust tail is visible.
Thirty minutes later the sky was almost totally dark and the dim parts of the comet popped out. Now both the yellowish dust tail and the bluish ion tail really stand out and are very long. Jump over to the Solar System astrophoto page to see this image. Urban light pollution will mask the fainter parts of the comet too. So if possible, go to a darker location to view this wonderful comet. You'll see a whole lot more of it!
Astronomy and music go together... right? Well, I think so anyway. So I regularly have music playing in the observatory when I'm out there taking pictures. Dottie and my favorite pianist/composer is Robin Spielberg and I thought her song Spellbound would be a perfect match for an astronomy slideshow. So I put together a music video using some of my astronomy photos set to Spellbound.
Dottie and I met Robin about a year ago and shortly into a conversation I learned she loves astronomy pictures. Since then Robin has been enjoying my astronomy photos that I've shared with her. When I sent Robin my Spellbound Nights video she posted it on her YouTube Channel as the "Spellbound - Official Video". How cool is that!
Here's a link to the Spellbound music video. Take a look!
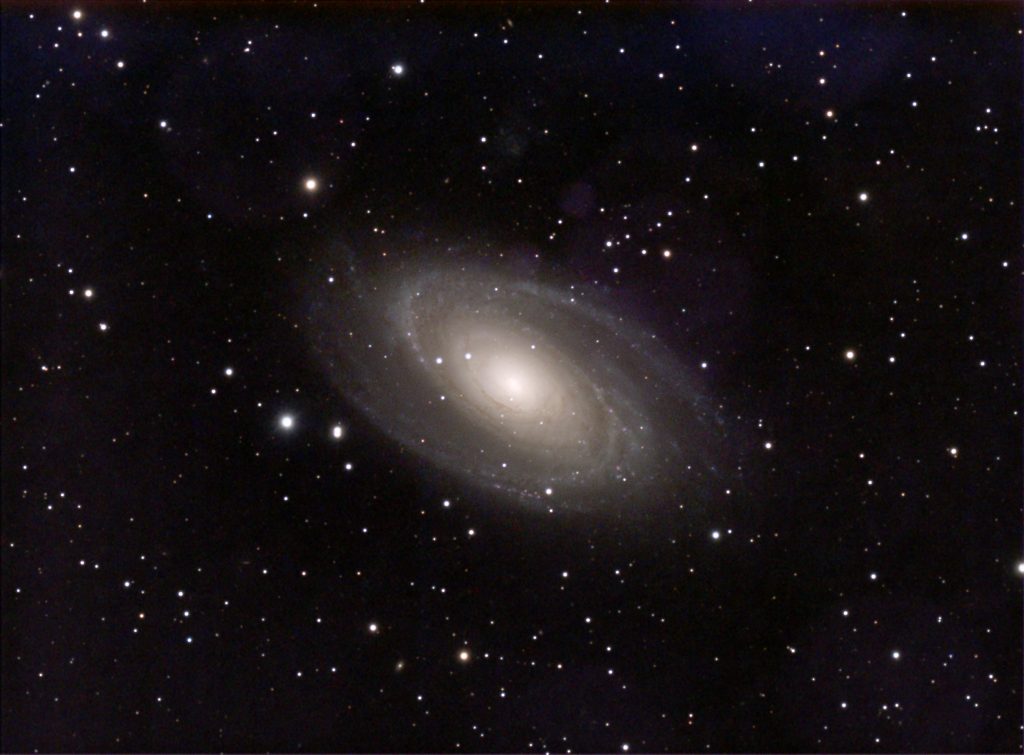
Back in May of 2005, 15 years ago, I got my first astronomy specific camera: the Starlight Xpress SXV-M8C one-shot color camera. Prior to that I was using my Canon 40D DSLR for astro photos. The 40D was a good camera in general, but too grainy for the long exposures needed for astrophography.
One-shot color cameras like the M8C include the Bayer color filter matrix over the sensor, just like regular photography cameras do. The good part of that is that a every exposure is a color image. The bad part is that the built-in color filters reduce the camera's sensitivity and require longer exposures than a monochrome camera does.
Galaxy M81 near the bowl of the Big Dipper
I took this 2-hour exposure time photo of Galaxy M81 with the M8C a couple of nights ago to honor it's 15 year anniversary. It can still produce a nice image!
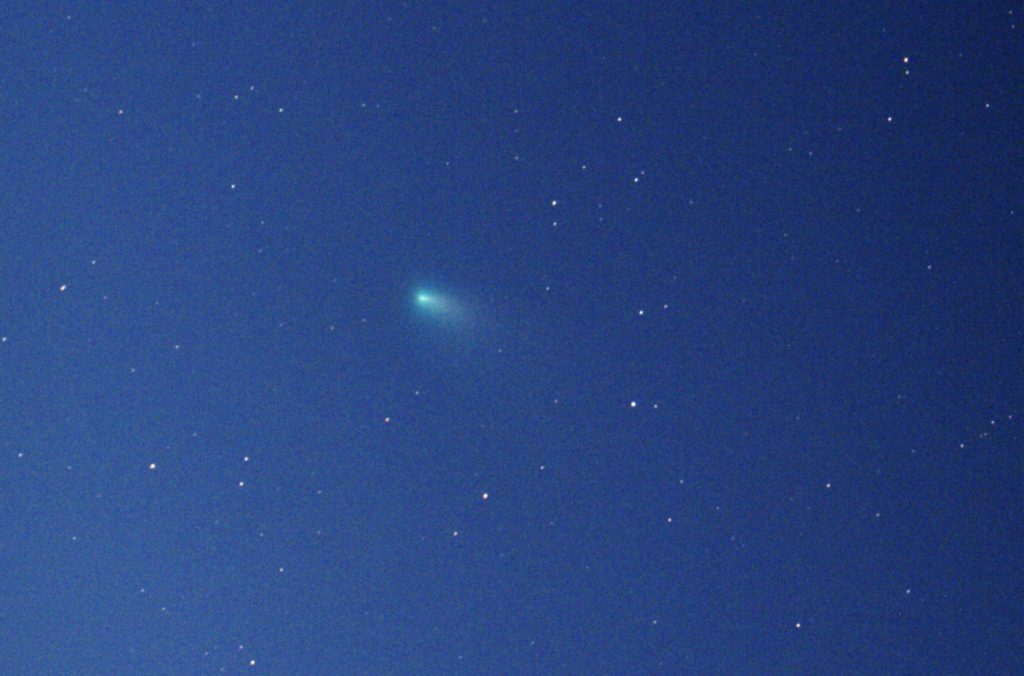
Early predictions for Comet SWAN (C/2020 F8) suggested that it could brighten to naked eye visibility and be a showpiece object. However, early comet predictions are often overly optimistic.
Comet SWAN the morning of May 14, 2020
As feared, it hasn't brightened as hoped. But there's another problem that impacts me taking a picture of it. The comet is staying low on the eastern horizon as it travels northward. The way my observatory is positioned, its roof blocked visibility of SWAN until it was above 9 degrees of elevation. By then the sky had already started its dawn brightening. That means the sky is masking the dimmer parts of the comet's tail.
To get an image while SWAN is still in a darker part of the sky I'd have to move outside of the observatory, maybe on the driveway where there's a better view of the low NE sky, and use my small portable telescope mount.
Maybe... we'll see.
Update on Comet Swan
On May 18th I did take another picture of Comet SWAN. Unfortunately there were cloud layers on the eastern horizon that blocked the comet most of the time. Just as the sky started to brighten, SWAN went between two cloud layers and I got a picture of it just seven degrees above the horizon. Go to the Solar System astrophoto page to see it. The comet was still small though, so it just didn't blossom as hoped.
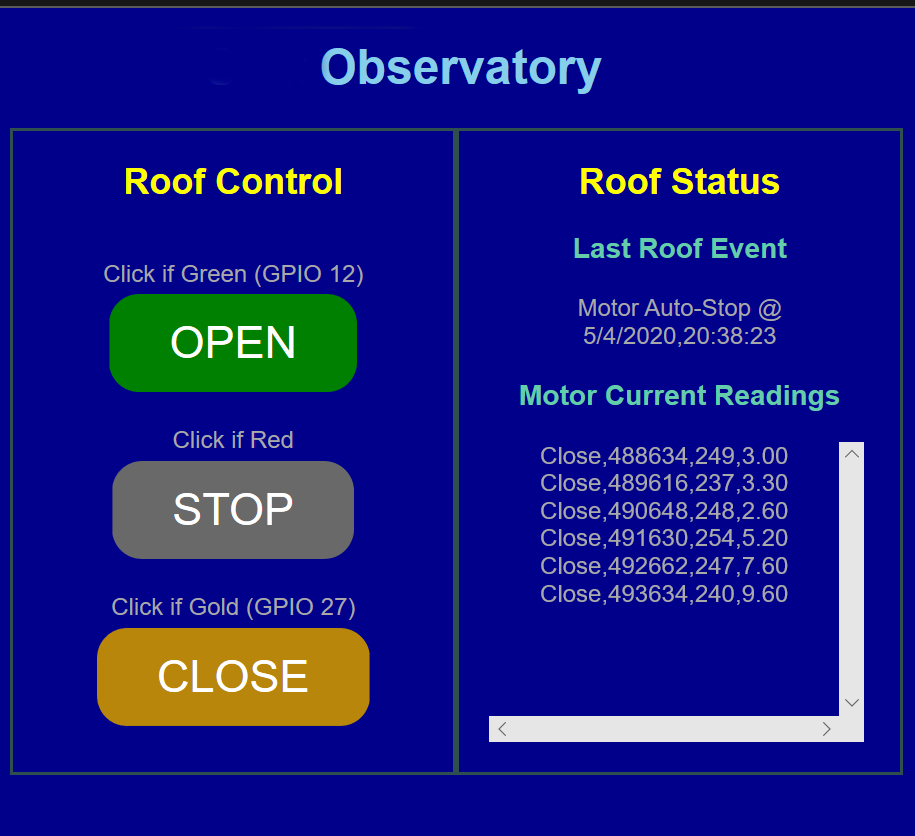
The roof controller Peter and I are designing for our observatories is continuing to evolve. Peter has it installed and working in his observatory!
A current sensor has been added to the hardware so that the system can monitor the roof's motor current draw and auto-stop on either an under or over current event. A real time clock (RTC) and a SD Card interface was also added to allow status logging.
Roof control and status monitoring is via a web page interface. This page will continue to evolve as new features are added. An example screenshot is shown below.
Controller Web Page Example after a Simulated Roof Closing Run
Even in the Southwest there are times that dew can form on exposed optics. Of course, once dew forms the image quality turns awful quickly. That applies to the dome of the Allsky Camera as well.
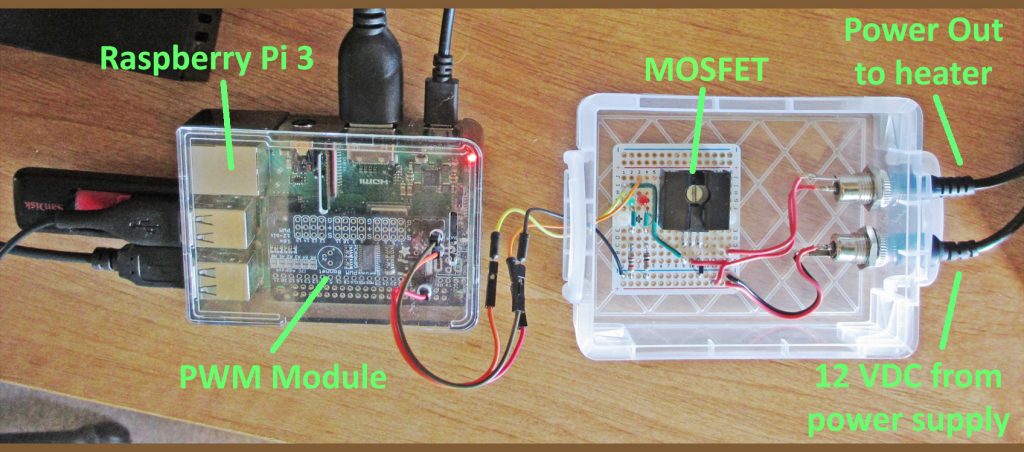
The Oculus Allsky Camera actually comes with a 12 VDC heater system that can be used to combat dew. It presented a problem though. The heater’s power supply can be plugged in or not. No control, not even an on/off switch. Full power or none. The problem with that is that astronomical cameras don’t like heat. As the heat goes up, the image quality goes down. What’s needed is a way to provide just enough heat to prevent dew and no more.
That was the start of the Allsky Camera Heater Controller project. After a few iterations that proved less than optimum, I settled on a design that is working out quite effectively. Essentially, the heater controller reads the current humidity and varies the amount of power sent to the heater to prevent dew. If the potential for dew goes up, the heater’s power percentage is increased. Conversely, if the potential for dew goes down, the heater’s power percentage is reduced or even turned off.
Since an Acurite 5-in-1 weather system was already installed at the observatory that was a natural source for the weather data. I chose a Raspberry Pi 3 as the system controller because of its computational capability, data storage capability, expandability and low power consumption.
The Acurite display has an USB output that is connected to the Pi. To collect the weather data I installed the WeeWx weather program on the Pi. WeeWx is a very nice program that collects the data, stores it in a database and produces a variety of reports to summarize and display the data. I used one of those reports to have it store a .csv snapshot of the current conditions on a flash drive every five minutes.
A Python program I wrote checks for new data in the .csv file and looks at the humidity. I’ve found that dewing of the camera dome starts at about 80% humidity. So the Python program will start to apply power to the camera’s heater at 70%. As the humidity rises the program will scale up the amount of power to the heater, reaching 100% power at 90% humidity.
The power applied to the camera’s heater is varied by pulse width modulating (PWM) the output of the 12 VDC heater power supply. An Adafruit PWM module is installed in the Pi and it’s controlled by the Python program. The signal from the PWM module goes to a MOSFET circuit that has the capacity to modulate the heater’s voltage and current. This arrangement allows the heater’s power to be varied anywhere between 0% and 100% as required.
The Python program provides monitoring of the heater’s performance by using the PyGal Charting Library to create the chart at the bottom of the Weather page. A quick check of the chart reveals not only the weather conditions, but also how the heater controller is responding to them to keep dew off the Allsky Camera’s dome.
The latest addition to the Weather page is a chart that shows the real-time weather conditions at the observatory. How cold is it right now? Is the humidity less than 10% (where did I put that bottle of moisturizing cream?). Well, just take a look to see.
The chart shows the last 24 hours of the weather conditions. That makes it easy to see highs, lows and trends. New data scrolls in from the right side and the oldest data drops off the at the left.
An Acurite 5-In-1 weather station is the source of the data. The Acurite display feeds a Raspberry Pi computer, which then generates the chart and uploads it to the web page.
Wow! Bryce Canyon in southwest Utah has some of the most unique rock formations of any of the National Parks. In addition to the typical red-rock colors, there is a section that has coral pink colors. A must visit place!
Of course, while there I ventured out at night to take some nightscape pictures. Timing wasn't the greatest as it was only a few days before full moon. So the first night after we arrived I went out to Sunset Point just as the moon was setting. I only had a little over an hour before astronomical dawn to get the picture. Although the canyon was black to the eye, the long exposures revealed quite a bit of detail in the rocks. Sirius, the Dog Star in Canis Major, is the bright star near center.
A couple of nights later the full moon provided almost daylight-like illumination for the photo at the Paria View overlook. I was pleasantly surprised that some of the summer Milky Way shined through the strong moonlight. The bright "star" in the upper right is actually Saturn!
Take a look in the Nightscape section of the Astrophoto section.
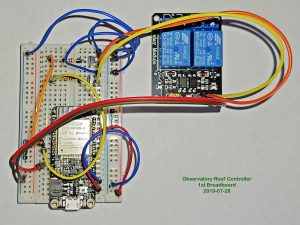
My astronomy buddy Peter and I have similar roll-off roof observatories. While we can control the mount and camera from inside our homes, we have to be in the observatory to open or close the roof. We decided it was time to automate roof control. "IoT", here we come.
Instead of buying a commercial controller we took the challenge of designing and building our own! The heart of the controller is an Adafruit ESP32-based Feather module. It will interface to relays and sensors, and connect to the internet to allow us to control it via our cell phone, tablet or computer wherever we are. The basic version of it is up and running! Here's what it looks like so far.
For several years now Dottie has been creating artistic and functional mosaic objects. That includes things like wall hangings, decorative balls and trivets. Several people have asked where they can see some of her creations and she's decided it's time to create a web page as a showcase vehicle. Jump over to Designs by Dottie and take a look!